Step 1 - Gather materials
Really, Step 1 should have been planning, but hey - we are smart people. We can figure it out later!
Wood - We went with a 3/4" sanded plywood from Home Depot. It was about $35 for a 4'x8' sheet. We bought 2. We also bought a few 2x4s to support the plywood.
Stain - Minwax Classic Gray. $8. Players choice on this - there is nothing magical about the color. We thought it would look good with the holds we bought.
Clear Coat - We had some of this on hand from one of Tina's previous projects. Not required, but hopefully will make cleaning it a little easier when necessary.
Holds - We went with bolt-on holds, as opposed to the screw-on holds. I found Rocky Mountain Climbing Holds (http://www.rockymountainclimbinggear.com/) on Amazon to be the best fit for what we wanted, and an awesome price. We bought the 50 pk for $72 including shipping. (https://www.amazon.com/gp/product/B0087SBJ3Y/) Most holds are a couple bucks a piece so these are a great deal. These holds look like they are actual stone. With the bolt-ons, it is easy to loosen the hold and turn it. Most of the holds have one direction where you can get a better grip than other directions so you can make the climb easier or harder based on how you position the hold.
We thought about getting colored holds to mark different climbs but decided against it, mainly because of price. Also, this is just for our boys in their bedroom and it wasn't like they care what color holds are they are grabbing. If we ever get to doing a big wall outside, we might try painting the ones we got to see if that will work.
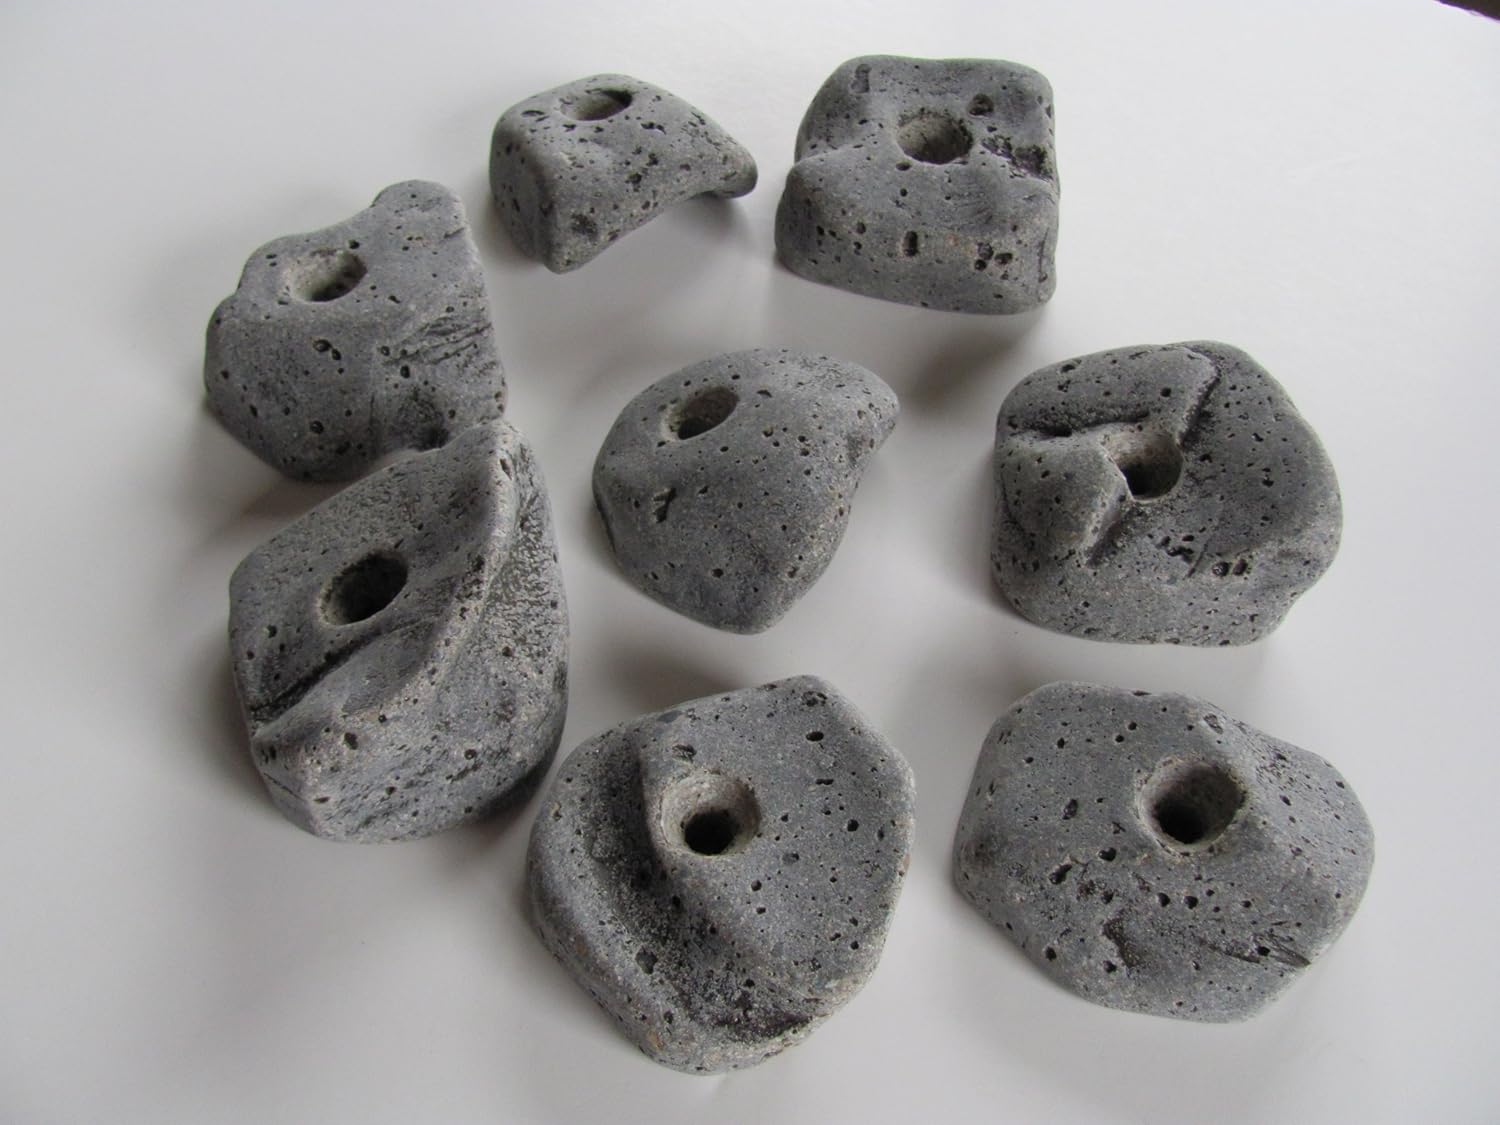
T-Nuts - The holds from Amazon/Rocky Mountain included hardware, but just enough to fasten the holds they send you. That was 50 in our case. We wanted to have a wall where the holds could be re-arranged whenever, so we needed more holes, more t-nuts. We used 72 on one 4x8 sheet. You can get 100 on Amazon for about $14-15 (https://www.amazon.com/dp/B003KIU2E8). When I realized I needed more, I couldn't find them with Prime shipping so I found some locally at Habit Climbing (http://www.habitclimbing.com/) in Salt Lake. Just a warning - I don't know if they ever answer their phone. I took a risk and showed up at their location in Salt Lake and they were able to help me out. Cool guys and they make some cool walls and holds. We got the 4 prong t-nuts. Apparently that is old school. At Habit I guess they mainly use the screw-in type. Old school was okay with me.

Drill Bit - you'll need a 7/16" bit. We have tons of bits, so I assumed we'd have one, but it isn't as common as I expected. Get a good one from Home Depot. I tried a cheap one from Harbor Freight and got what I paid for (plus my free flashlight with coupon!).
Step 2 - Assemble
First, we stained the plywood, then put on the clear coat. Use rubber gloves if you prefer to wipe on the stain with a rag. Scrubbing my hands off after Tina suggested that wasn't too bad since I did it right away. Ideally, you use a good paint brush for the clear coat, otherwise you have to pick out the lost bristles along the way.
After that is all dry (we left it over the weekend) we marked and drilled out the holes.
This is where it would have been a good idea to have done some planning ahead of time. We were able to make it work. More on that in Step 3 (good idea to read ahead if you are doing this as you are reading for the first time!)
We went with a staggered pattern with holes and rows every 8 inches, like this:
I started by marking one of the long edge of the board, starting at 4" from the end, then every 8" after that. Then I used my 4' drywall tee to mark the holes across the board at each mark. If you don't have a drywall tee a tape measure is fine, but you'll probably want to mark both edges of the board so you make sure your lines stay parallel. The first line I marked at 2", 10", 18", etc. Then the next line was 6", 14", 22", etc. Then back to starting at 2", and repeating back and forth.
If you are going to end up with multiple boards, this pattern works well so the hole distances are consistent as you transition from board to board. You really don't need the bottom row of holes if your board goes down to the floor.
With all the holes marked, we drilled each mark. The holes didn't come out as clean as I hoped, so if you have tips for that let me know in the comments!
Next step is to install the t-nuts. Flip your board over. Place a t-nut in a hole. Pound it a couple times with the hammer. We had ours on saw horses and Tina and I were both working on it. We had to take turns because when one of us started pounding, the other's t-nut would jump out of the hole as the board bounced. Kind of entertaining, really.
At this point we bolted some holds on and leaned the board against the house and let the kids try it out. Thumbs up on the Sanity Check.
Our wall is 8' x 6' so we cut the second board in half length ways and followed the same pattern for the second piece. If you know what size you need your pieces, they will cut it for you at Home Depot.
Step 3 - Install
This is where I realized I should have done more planning and checking before building everything. We set up our boards in a vertical/portrait orientation. So take the diagram above and rotate it 90 degrees. With that setup, there is a 4" space between each vertical row of holes. That is great, because a 2x4 is 3.5" wide so it fits great. What gets tricky is the edges of the board, and aligning that to the studs in your wall.
The edges only have 2" before the first hole. On the wall we put ours on, it happened to work out that we could put one 2x4 brace between the first and second row of holes on the left, then the second brace lined up to put on the opposite edge of the board on the right, so half of one board and half of the the second board could attach to it.

On the opposite side of the second board, though, the 2x4 wouldn't line up with a stud if we placed it between rows of holes, and there would have been a gap between the back of the board and the wall. We didn't like that idea, so we ended up lining up the 2x4 with the edge of the plywood and drilling holes into the 2x4. It made it more difficult to get everything lined up when we attached it to the wall, but like I said before, We are smart people - we figured it out.
At this point you might be wondering, "Why do you need 2x4s at all if attaching it to an existing wall?" Excellent question. The reason is that the bolts are long enough that they go through the hold, through the board and t nut, and still stick out the back of the board.


So the 2x4s give you some space off the wall so the bolts aren't gouging your drywall.
If the staggered/zigzag pattern doesn't work with your wall and where you can attach 2x4s, you might go with a standard grid pattern, starting 4" from each edge, then every 8" after that. You end up with the same number of holes, but have more space between each row. It will look like this:

With that all done, we finished adding holds to the boards. Six feet wide was wide enough that I did three climbs. One easy, one a little harder, and one that will really push them.
It is fun to see them climb, but I really enjoyed watching our older boy try the hard climb and struggle a little and have to really work to reach the top.
Here's the final product!


Well there you have it. If something doesn't make sense or you have other questions, add a comment or shoot me a message. There are lots of DIY Climbing Wall posts out there, but hopefully this is somewhat helpful!